Montags mit Mama: Presents!

Hippo is really getting into the Christmas spirit! We put up our trees (yes, we have two! One with just ball ornaments in silver and red, one with all our special ornaments we’ve collected over the years), and now he wants to start putting presents under them! So he and AP3 have been “wrapping” presents!

He found a small empty box, filled it with some shape beanbags. Why? I don’t know! That’s just what he thought should go in the box! And then he and AP3 wrapped the box in some old Christmas paper.

2016-11-28-12-54-44

Is it perfect? Of course not! But he had so much fun! He was so happy to bring it to me as I’m working in my office (try not to look at the mess behind him!). And after I unwrapped his Geschenk, he wanted to do it all over again! I think they rewrapped the “gift” 3 times!

You don’t need anything special. Just grab an empty box, some old wrapping paper, tape, and whatever your little one wants to put in the box. Turn on the holiday music, and have some fun!

What a simple activity to do during the holidays!

Learning Vocabulary with an Adventskalender (Advent Calendar)

Years ago when I was teaching at a German Saturday school, I wanted a fun way for my students to learns some Christmas vocabulary. I remembered making a paper chain advent calendar as a child and thought I could combine the two into a fun activity. For the past few years, I’ve been working on creating something similar for my kids. This new version includes printed stickers (that you make using round labels). Froggy has enjoyed it for the past few years. And now Hippo is old enough to get in on the action. I have the words printed on two different papers, so there won’t be any arguing over whose turn it is to do the calendar!


Here’s more on how it works:

Materials:

  • round white labels, 1 2/3 inches in diameter (compatible with Avery 5293)
  • white card stock, 2 pieces
  • tape
  • scissors or craft (X-ACTO) knife
  • letter-sized paper in holiday print, red and green, or whatever pattern/color you like, 2 pieces (I have a stack of 12×12 holiday crafting paper, and I just cut it down to size: 8½ x 11)
  • glue/tape/stapler

Instructions:

  1. Print the stickers on the round labels.
  2. Choose which version you want and print out the Adventskalender on the card stock.
  3. Tape the two pages together to make one long page.
  4. Carefully cut slits in the bottom page along the two black lines. (You can use an exacto knife or the blade of a pair of scissors.)
  5. Print the chain vocabulary words on patterned/colored letter-sized paper. *If using patterned paper, be sure to print on the back (white) side!
  6. Cut out the vocabulary words. A paper-cutter comes in handy here! Don’t worry if it’s not perfect. You won’t really see the lines!
  7. Begin making your paper chain, securing your loops with glue, tape, or a stapler. Be sure to save one strip to attach the chain to the Adventskalender. Be sure the word is on the inside and the decorative side is facing out! You can put them in random order or in alphabetical order (like the Adventskalender). Slip the last strip through the slits you made in the bottom of the Adventskalender and then through the first loop on your chain.

Hang up your Adventskalender! I like to use double-sided poster tape. Each day, have your child take off one strip. Copy the word onto the black space (if using the version without words). And match the sticker to the word!

I used to hang ours on the outside of the pantry door in the kitchen. But this year, I hung it up in the dining room next to our German calendar. I like that the kids can see it while they are eating at the table.

2016-11-27-11-29-00

Download all the materials in PDF here:

Stay tuned for a fun craft to celebrate Nikolaus!

Save

A Little More for “Martinstag”

I was in the Pre-K/Kindergarten class today. I just love sharing the stories of St. Martin with the children. In a Montessori-based school where the principles of peace and respect are not only taught, but practiced on a daily basis, the kindness and generosity of the St. Martin story fit in beautifully.

This year, I had a new tool for telling the story. I ordered a set of Bildkarten (picture cards) called St. Martin feiern mit Emma und Paul – Bildkarten für unser Erzähltheater. The cards are nice and big (DIN-A3: 11.7 x 16.5 inches), and the images are simple and clear. I didn’t use all of the cards, but chose a few to talk about Martin cutting his cloak in two to share with the beggar, the children crafting lanterns and then parading at night in the town square. There are also some images to show Paul dropping his Martinsmann cookie and Emma breaking her own cookie in two to share with Paul. Very sweet!

The books I have for Martinstag have quite a bit of text. They work fine for story hour, where the children come from German-speaking families. However, I really liked the format of having large pictures to show while I explained the story, simply and in English.

martinstag-bildkarten

After teaching the words to “Laterne, Laterne,” the children made their paper lanterns – with some help from the two teachers and myself. We were glad to have some tape on hand, as a few of the children didn’t quite get the instruction not to cut all the way through! One of the teachers gave the useful tip that cutting the strips in the lanterns is very much like cutting fringe – a work they do regularly in the classroom.

As the children finished their lanterns, they took a seat on the rug until everyone was finished. Then we sang the song as we paraded through the classroom and out into the hall. The principal and several other staff members came out to see where the singing was coming from. She said it sounded like little angels!

If you missed the post on the lantern instructions or the vocabulary cards to help teach the song, click here to go back and take a look!

How do you help the children celebrate Martinstag? I’d love to hear!

Der gute Martin

Next week marks the celebration of St. Martin’s Day. I have to admit, while I lived in Germany, I never actually witnessed the children walking through the streets with their homemade lanterns on November 11th. I didn’t know about the special day until I was teaching in the States at a German Saturday School. It’s such a sweet celebration, though! Now I love to share it with the children at Story Hour and in Preschool.

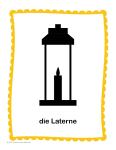
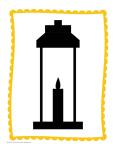
To go along with the celebration, I have created a very simple lantern for the children to make. You can print it out, let them color the paper if they like, and then cut along the dotted lines and assemble it. You can download the template and instructions in PDF format here: martinstag-laterne

2016-11-04-11-10-34

A finished lantern from Story Hour

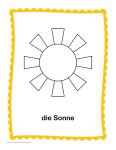
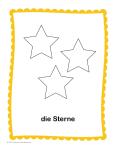
The songs that go with Martinstag are also very important. We always sing two of the most popular ones at Story Hour: “Laterne, Laterne” and “Ich geh’ mit meiner Laterne.” When I teach Preschool, I often just do the first two lines of “Laterne, Laterne,” since it is easy to learn and helps the children learn some of the more important vocabulary words: Laterne, Sonne, Mond, and Sterne. To teach the songs, I made up some vocabulary posters of these four words, a coloring page, and a sheet with the lyrics. You can download all of them in PDF format here:


Here’s an idea of what they look like:

When I teach Martinstag at Story Hour, I include several books. I have a few about Martinstag itself. This year, we’ll be reading Laterne, Laterne, da oben leuchten die Sterne by Dagmar Geisler and Rosemarie Künzler-Behncke (Ravensburger, 2009). I also like to read the fairy tale “Sterntaler” about the little girl who gives away all her earthly possessions to others in need and is rewarded in the end with a shower of coins that fall from the stars to last her the rest of her life. (I actually made my own book of this fairy tale, so I don’t have one to recommend here.) This year, I’m adding a beautiful new book (well, new to me!) called Der rote Faden by Anne-Gaëlle Balpe and illustrated by Eve Tharlet (Minedition, 2014). In this story, little Oli finds a red thread and by passing it on, he learns how little it takes to help others.

Save

Halloween & die kleine Hexe

When I teach German at preschool around Halloween, I like to do a lesson on colors to go with the song, “Ich bin die kleine Hexe”. First we review a few colors. Then we sing the song to practice the colors. At this point in the year, we’re starting with the basics: just the primary colors of red, yellow, and blue.

I created a full-sized poster of a pair of shoes and printed them on red, yellow, and blue paper to use as a cue when we sing the song.

schuhe-kleine-hexe-gita-page-001

There is also a coloring page with three sets of shoes, one for each color. The lyrics are on the sheet as well, so the children can bring them home with them. I often hear from parents about how the children sing the songs I teach them, but they don’t know the songs! So I hope this helps them out.

schuhe-malvorlage-gita-page-001

You can download them each here as PDF:

You can also find the sheet music here at Labbe.

Happy Halloween!

Montags mit Mama: Pumpkins!

It’s that time of year! The leaves are turning fiery colors. The air is getting crisp. And it’s time to visit the pumpkin patch! We started the tradition 3 years ago. Our local patch is only about 10 minutes from our house. We can go on a hay ride or pull a Radio Flyer wagon out to the pumpkins. The boys always enjoy being pulled out to the pumpkin patch in the wagon.

We got some small pumpkins this year in addition to the bigger ones we would carve. So Hippo and I got out the paints and started decorating. We used circle-shaped sponge brushes in different sizes to start applying paint. Perfect opportunity to talk about shapes! Hippo started out by making a pattern. I was so impressed! But then he just couldn’t stop himself. So it turned into a lovely blue-green pumpkin. That’s okay, though. It’s the boys’ favorite color!

So our little activity allowed us to talk about fall, pumpkins, shapes, and colors.