Ich habe Hunger! German Song

Tomorrow, I’ll be giving a lesson on FOOD using Eric Carle’s book Die kleine Raupe Nimmersatt. It has long been a favorite in our house! Since I know it so well, I thought it could make a good Story Listening lesson.

I have a number of activities to go along with it. I’ll post about each one of them.

To start, after I tell the story, we are going to sing “Ich habe Hunger!” Do you know it? It goes like this:

Ich habe Hunger, Hunger, Hunger
habe Hunger, Hunger, Hunger
habe Durst!

I’m sure you can find it on YouTube if you do a quick search!

For teaching the song, I made a small poster with the words:

Ich habe Hunger SONGTEXT-page-002

You can download the PDF here: Ich habe Hunger SONGTEXT GitA

Viel Spaß!

Zungenbrecher

I’ve decided to start using tongue twisters in my 1st/2nd-grade class. But I need a place to collect some good ones. I’ll keep them simple to start. If you have any good ones, please leave a comment!

The first one we did was:

In Ulm und um Ulm und um Ulm herum

First, I had to teach them how to say “Ulm”. I also made sure they knew that Albert Einstein was from Ulm!

Story Listening: Klingelingeling

I was back in the 1st/2nd grade today! So it was time to tell another story. I selected one of my favorite read-aloud children’s books: Klingelingeling by Nicola Smee (arsEdition, 2010; original English title: Jingle-Jingle).

klingelingeling

Of course, I didn’t actually read the book. I told it as a story, which meant I had to add some description. Since the book is copyrighted, I can’t post my version of it here. But it wasn’t too hard to work out!

For today’s lesson, I wanted to add a brief discussion about the weather. So after our hello song, I asked the children about the weather for today. I told them the words in German and wrote them on the board: es regnet, regnerisch, warm, leichter Wind. I’d like to start each lesson with the weather in the future.

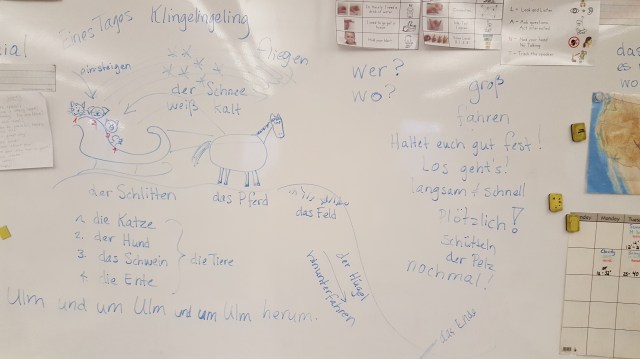
From there, we went right into our story. I was really pleased with how it went! It’s such a fun little story, especially when the horse climbs into the sleigh, so he can ride down the hill with the other animals! I did have to figure out how to draw all those animals, though! I used a book called The Usborne Step-By-Step Drawing Book (Usborne, 2014):

Usborne drawing book

(They didn’t have a duck, so I looked up some ideas online.) When I drew the horse, I warned the children not to laugh at my drawings. They actually clapped! They could all tell it was a horse. Success! Here is a look at my finished story board:

2018-01-12 11.16.40

When I finished the story, they asked where it was from. So I told them about the book. I happened to have it with me, so I showed it to them. Most of them wanted to hear it, so I read it aloud to them. I think it was actually a great way to reinforce the story and repeat the vocabulary!

I made up some worksheets for them to practice the main words: die Katze, der Hund, das Schwein, die Ente, das Pferd, der Schlitten. I thought about Schnee, too but decided to keep it to 6 words (I like even numbers!). The tasks included:

  • matching picture to word
  • tracing the word under the corresponding picture
  • writing the word under the corresponding picture (I left this one out today and just used the tracing words)
  • a word search
  • cut out 4 images and paste them in the correct order on the next page

They did great with the first pages. Some of them had trouble with putting the images in order. It helped if they started with the last one first, since it’s obvious (they flew out of the sled when they reached the bottom of the hill). I did not expect them to be able to read the text under the pictures, but it’s there for exposure.

You can download the worksheets as a PDF file here: Klingelingeling Arbeitsblätter, 2018 GitA

Before I sent them off to work on the assignment, though, I had one more bit of fun with them. I decided to try a tongue twister! I do love a good tongue twister! I was surprised to find that I had to explain what it was for some of the children. But then I also got to show off my “Peter Piper” 😉

For our German tongue twister – or Zungenbrecher (literally: tongue breaker), I chose:

In Ulm und um Ulm und um Ulm herum

I started by teaching them how to pronounce Ulm. Oooooooo. Then add the L, then the M. Then make it short. Then we started very slowly. And we worked up our speed. Some of them got quite good at it!

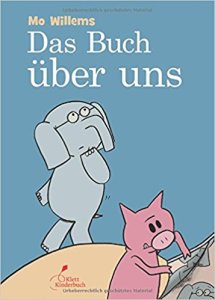
After they completed their worksheets, I had one more surprise for them. They had been begging me to read an Elephant & Piggie book by Mo Willems. A few of them have been translated into German, and I just happen to have one: Das Buch über uns (Klett Kinderbuch, 2015; original English title We are in a Book).

Buch über uns

For the most part, they really enjoyed it. And some of them knew it well enough in English to translate as we went along. That was fine. It was the end of a very long lesson (I ended up being in the class for an hour and a half!) at the end of a Friday half-day. So it would have been a lot to expect them to sit still and just listen!

Overall, I’d say it was a very successful lesson! I was exhausted, but then I usually am! And it’s so worth it! Even Froggy said he enjoys the lessons, even though he isn’t really learning anything new 🙂

Nikolaus und die drei Töchter (eine Legende)

Today I was finally back in 1st & 2nd grade. We’re a few days late for Nikolaus, but that’s okay. I started the lesson off with a story, of course! This time, it was the story of Nikolaus and the three daughters and how he helped them by throwing sacks of gold through their window, so that they could be married. Here is the story I told:

Nikolaus und die drei Töchter: eine Legende

Vor langer, langer Zeit lebte ein lieber Mann. Der Mann hieß* Nikolaus. Er hatte ein großes Haus. Er hatte viele schöne Sachen. Er hatte viel Geld. Er war ein reicher Mann.

Aber Nikolaus war traurig. Er war allein. Er hatte keine Familie. Er war nicht glücklich. Sein Geld machte ihn nicht glücklich.

In seiner Stadt wohnte ein anderer Mann. Dieser Mann hatte drei Töchter. Der Mann hatte keine Arbeit. Und er hatte kein Geld. Er war arm. Weil er kein Geld hatte, konnten seine drei Töchter nicht heiraten.

Nikolaus wusste von diesem Problem. Er wollte helfen.

In der Nacht warf Nikolaus einen kleinen Sack durch das Fenster. Am nächsten Morgen fand eine Tochter den kleinen Sack in ihrem Schuh. Der Sack war voller Gold! Jetzt konnte die erste Tochter heiraten!

Am nächsten Morgen fand die zweite Tochter einen kleinen Sack voller Gold. Jetzt konnte die zweite Tochter auch heiraten!

Am nächsten Morgen fand die dritte Tochter einen kleinen Sack voller Gold. Jetzt konnte die dritte Tochter auch heiraten!

Nikolaus hat die Familie geholfen*! Und er wollte andere Leute auch helfen. Endlich war Nikolaus glücklich!

Ende.

You can download a PDF of the story here: Nikolauslegende printable – GitA (I pieced together and simplified the story using some online sources. You can find them listed in the PDF printable.)

We did a few different activities after I told the story. I made up some worksheets to go with some of the vocabulary from the story. I decided to focus on the opposites: glücklich – traurig, Nacht – Tag, groß – klein, reich – arm.

You can download the PDFs here: Nikolaus Opposites Arbeitsblatt – GitA 2017

I also taught them the traditional Nikolaus song: “Lasst uns froh und munter sein”.  Do you know it? Here is the first verse:

Lasst uns froh und munter sein
Und uns recht vom Herzen freuen
Lustig, lustig, tra la la la la
Bald ist Nikolausabend da
Bald ist Nikolausabend da!

I gave out my coloring page with a picture of Nikolaus and the first verse to the children to color. You can find it in this post.

I decided to give them the riddle, Das Haus vom Nikolaus, as well, where you have to draw the house in 8 lines without lifting  your pencil! You can find the download in this post.

Our main activity was a boot-lacing craft. First the children decorated the boot with silver crayons. I brought them in special 🙂  Then they laced the black construction-paper boots with red yarn and glued red pom-poms at the top for fur.

2017-12-08 11.33.37-2

All the instructions along with the boot template can be found in this post.

We actually did the boot-lacing project first. Then I gave them hand-outs to work on after they finished their boots.

Das ist das Haus vom Nikolaus

Nikolaus Day has come and gone. It’s a VERY busy time of year in our house – Sinterklaas arrives on the 5th, Nikolaus on the 6th, and we have a birthday on the 7th. Lots going on! So I’m a little late with this post. But perhaps you can tuck it away for next year. Or what the heck – it’s still the holidays! Go ahead and play this little game any time in December!

Do you know the riddle of the house from Nikolaus? It’s technically a math problem. You have to draw his house in 8 strokes without lifting your pencil. And that makes one stroke for each syllable: Das ist das Haus vom Ni – ko – laus! Is it challenging? Perhaps. But there are actually 44 different ways to solve the puzzle!

Das Haus vom Nikolaus GitA-page-001

I made up this little worksheet for my 1st & 2nd graders to try it out. There is the example of the house at the top. Then there are the dots to connect at the bottom. It’s fun to try out different paths!

You can download the document here: Das Haus vom Nikolaus – GitA

Want to see all 44 ways to draw the house? Check out the cool GIF file from Wikimedia below…

I’ll be teaching a lesson on Nikolaus tomorrow. I’m telling the class one of the legends about Nikolaus in German. Then we’ll do a lacing boot activity. Check out my post from last year for instructions on the boots!

Viel Spaß!

Martinstag in the Classroom: Part 2

As I mentioned in a recent post, I love teaching about Martinstag, because it embodies the spirit of giving and selflessness. In the past, I’ve taught about Martin in the German story hour and in the pre-k/kindergarten class. This year I finally got to bring it into the 1st and 2nd grade class. Each class is a little bit different. In this post I’ll tell you about what we do …

in 1st & 2nd Grade…

This is a mixed class of 22 students. I couldn’t just jump right in with books and songs, like I did in Story Hour. Instead, I started with the story of Sterntaler. The children were outraged that the poor girl was all alone! And then shocked when she kept giving everything away! They were right with me the whole time 🙂  My board looked a little different, since they needed more help to understand it. But they had also experienced the method the week before when I told them Goldilocks. Here is a picture of my finished board for Sterntaler:

2017-11-03 15.06.15

After that, I read them the story of Martin, using the book Das erste Buch von Sankt Martin by Erwin Grosche (Gabriel Verlag, 2017). I used the book mainly for the illustrations and wrote out the story in English beforehand. I knew after hearing Sterntaler, that was probably enough German for that class (especially since it was 2pm on a Friday … the week of Halloween!).

Martin

Next I wanted to teach them the song, “Laterne, Laterne“. The beginning is so simple with its four words: Laterne, Sonne, Mond, Sterne. I knew they would need a little movement by this time, though, so I came up with a little game. I had printed out the vocab words on small cards. I printed enough so that each child could have a card. I just used my full-sized word posters and printed them 4-to-a-page. Then I laminated them and cut them down to size.

I handed the cards out to the children and then had them get into groups according to the picture – in order, of course! I had already gone over the words using my full-sized word posters. So they were familiar enough with the vocab. I called out a word, and that group had to raise their picture and say the word. I mixed them up and first. Then I told them to pay attention, because we were going to speed it up! And I went in order according to the song: Laterne! Laterne! Sonne! Mond! Sterne! They enjoyed the little game. And weren’t they surprised when I told them they had just learned the beginning of a song?!

You can download the word posters along with song lyrics in the post Der gute Martin.

Finally, it was time to make our lanterns! We did them a little differently in this older class. Although in hindsight, I’m not sure I would do it this way again!

  1. I gave them white paper cut down to size (without the strip for the handle) and let them color it however they liked.
  2. I gave them the lantern template printed on yellow paper (without the sun, moon, and stars – just the lines for cutting and folding) and asked them to cut the strip off the end to make the handle.
  3. They glued their white paper to the yellow template (I might do this step myself, in advance, if I try it again).
  4. They folded the paper (I was surprised how many of them did not fold on the line, but folded the long edge of the paper up to the line! If you read my post with instructions, you’ll see why I decided to give step-by-step instructions the next time!)
  5. They cut the “fringe”.
  6. We went around and stapled the lanterns together along with their handles

The lanterns turned out alright in the end. But it took so long that we did not have time to parade in the halls.

Then again, it was the last hour of school on a Friday. And did I mention it was Halloween week?? Scary stuff!! 🙂

Tutorial and templates can be found in the post Martinstag Lanterns!

Viel Spaß!

Martinstag Lanterns

Every year I like to share the celebration of St. Martin with the children I teach – in the story hour, in the pre-K/kindergarten class, and now in the 1/2 class I’m working with. It’s such a wonderful celebration of the spirit of giving.

Every year we make a simple paper lantern. This year, I learned a few things to make the project even better 🙂 Here are the children from Lesestunde with their lanterns:

2017-11-03 Martinstag postJust look at those smiling faces 😉

And here is what the template for the lantern looks like (front & back):

  1. Cut the long strip off the left side to save for the handle (follow the long line on the “back” image)
  2. Color the front – the sun, moon, and stars
  3. Turn to the back and fold the paper along the dotted line
  4. Cut “fringe” along the other dotted lines – stopping at the hash mark at the end
  5. Unfold the paper – fold it back the other way
  6. Wrap the paper to make the lantern, staple at the bottom, staple at the top along with the handle

First, I decided to get out my paper cutter and cut the handles off for the children. Having to first cut a whole strip off the paper and then make fringe seemed rather confusing. This way, they only have to worry about the fringe. It worked great!

Sedond, I am learning to give better – clearer – instructions! You would think this would be obvious. But it’s something you really have to think about! So I had Hippo help me make samples of our Laternen – one for every step (color, fold & fringe, unfold):

When I went in to his class, I had the samples all ready. So I could easily demonstrate the steps to the children. I showed them a colored paper. Then I showed them how to fold it. I had one folded already with one line of fringe cut. Then I showed them how to cut along the dotted lines to cut the rest of the fringe. That’s basically all they needed to do. We had four adults for 20 children in the room (I brought AP4 with me – another great idea!), so we each had a table of 5 children to help. When they were finished with their three steps, we folded the paper into the lantern shape and stapled on the handles. It was the most successful lesson I’ve ever taught for Martinstag!

2017-11-06 09.09.12 - Copy

See how the lantern “poofs” when you fold the the paper back on itself in the middle after you cut the fringe?

To download the instructions and template for the lanterns, click here: Martinstag Laterne (GitA)

For other materials, see my posts from previous years:

Viel Spaß beim basteln!

Goldilocks and … Two Firsts for Me!

For the very first time, I taught in Froggy’s 1st & 2nd grade class! And for the very first time, I used a method of language teaching called Story Listening (SL). You can read all about the method at the Stories First website. It was a total success! I’m so thrilled!

I had the children for a whole hour!

As I entered the group, I said, “Guten Morgen,” and repeated it. To my delight, the children chimed right in! Then we went right into “Ich heiße…” Again, they were ready to repeat! We practiced the “ch” sound. Then we started again. The only thing was, they repeated my whole sentence, including my name 🙂  So we straightened that out, and I went around the room, asking each child’s name. I started with the 4 children who had been in my German class in Pre-K/Kindergarten. I figured they would be more comfortable with saying the phrase, and they could also be a good model for the other children.

Next, I talked to the children about magic. Yup. Magic. To me, speaking a foreign language is a lot like making magic! It’s like cracking a code. Or knowing a secret – the good kind of secret 🙂  And just look! All of the children had already worked some magic! I never told them what Guten Morgen or Ich heiße meant. But of course, they knew. Then I told them I was going to teach them some more magic a little later….

Then I taught them the hello song. I used my word posters to teach them the actions: klatschen, stampfen, patschen. And we counted to 2. We talked about doing the actions quietly, so the classroom below us didn’t think there’s a herd of elephants – or a thunderstorm – upstairs! And then I asked them if I was showing them the right word, so they could practice ja and nein. Finally, it was time to sing the song!

Next it was time for the children to be magicians! Because I was going to tell them a story.

A whole story, all in German!

I asked them to listen with their ears and watch with their eyes, and just relax and take it all in.

Of course, we needed our magic words to start the story: Es war einmal…

I had practiced telling a simplified story of Goldlöckchen (Goldilocks). As you tell the story, you draw pictures on the board and write the word in German (L2) underneath it. You can use other tools from the SL toolkit (on their website), too, like gestures and antonyms to help with comprehension. The children were right with me, the whole time! Here’s what the board looked like when I was finished:

2017-10-27 11.42.07

Of course, by the time I had finished, the kids were a little restless. Time for some movement! So we played a game of Simon sagt! (Simon Says). We used the verbs from the hello song (klatschen, stampfen, patschen) plus the verbs from our story: essen, spazieren gehen, rennen, einschlafen, aufwachen. It was a big hit!

Then I had handouts for the children to do. I had come up with 5 ideas, and the teachers liked them all, so we made up packets for them to do. The first and second-graders got different ones, based on difficulty.

You can download the handouts here: Goldlöckchen Arbeitsblätter GitA

The Stories First website also has a collection of stories for various languages and levels in the Great Story Reading Project. You do have to register to gain access.